Tuesday, July 30, 2013

Make Your Own Luxurious Lavender Bath Salts


Some of you already know that I *love* lavender and *love* making things derived from these precious plants. This luxurious bath salt is another example of what we can prepare from our back yard!

Lavender is thought to come from the Latin word "lavare" which means "to wash". I can't think of a more therapeutic way to use this amazing flower than with a long and hot soak. It detoxifies, heals and soothes your skin while the aroma is known to be calming.


All you need to make these bath salts is course sea salt (epsom salts can also be used), dried lavender and a clean jar with lid. If you don't have a bath tub, then consider making this a gift for a friend that does. Prepare this present while the lavender is abundant and you have a wonderful treat to give in the autumn and winter when a warm bath is desired.


You can purchase dried lavender or dry your own like we did.


The ratio I used to make the salts is 1/8 cup of dried flowers to 1 cup of course sea salt (you can go as little as 1 tbsp. dried flowers to 1 cup of sea salt). You don't want to put too much lavender in because they will float in the bath and potentially clog your drain. You could also use a sachet bag to avoid the loose herbs.


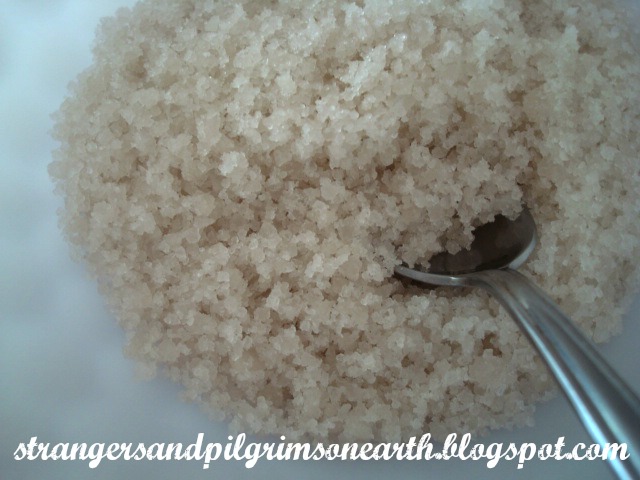
Mix together the salt and dried flowers.

Optional: You may add in a few drops of lavender essential oil for aromatherapy benefits.


Pour into a clean jar (I recycled an old condiment jar).


Label with love and decorate with ribbon if you plan on gifting (our label is shared below for your use).


Directions: Add approx. 1/2 cup to bath water as the tub is being filled. Soak in the goodness…

Enjoy the numerous health benefits of sea salt soaks!


"You shall make of these an incense,
a compound according to the art of the perfumer,
salted, pure, and holy."
~ Exodus 30:35


You may also be interested in What to Do and Make with Lovely Lavender.


Monday, July 22, 2013

Summer Inspired Beauty for Your Home

photo source

To have your home pervade the pleasures of the sunny months is very relaxing therapy for the homemaker. These seasonal decorations can be prepared with zero expense and an abundance of love.

A simple vase of flowers from your backyard is always a cheerful welcome!

Don't forget the simplistic beauty of summer produce in a vintage style basket.

photo source
Some sand and shells make a delightful decoration.

photo source
Add a candle for a dreamy scene...

photo source
A mason jar with sturdy wire will make a lovely lantern.

photo source

“If you have been afraid that your love of beautiful flowers and the flickering flame of the candle is somehow less spiritual than living in starkness and ugliness, remember that He who created you to be creative gave you the things with which to make beauty and the sensitivity to appreciate and respond to His creation.”

photo source

Monday, July 15, 2013

Our Favorite Creation Science Videos ~ Simple Summer Schooling


The knowledge of creation science in this evolutionary-indoctrinated age is a tremendous tool for the believer to acquire. The concern for our children is… if they do not accept that God created the heavens and earth as recorded in Genesis, perhaps they will begin to disregard other areas of Scripture as well. A solid foundation in the Bible is key. When the world questions our beliefs using the "sword" of science, are we prepared with sound, scientific answers that bring honor and glory to our Creator?
Here is a list of our favorite creation science videos that helped to build a scientific foundation of faith in our family. They are wonderful to keep your home education alive during these warmer months. Make the evening special with a fruit salad or popped corn. Learning together about God's creation is fun!

Note: The Creation Mini-Series from Answers in Genesis is like a "Creation 101" class for anyone who is new to this fascinating subject of science and the Scriptures.

For Younger Children 4 and up:
For Children 6 and up:
For Children 8 and up:
For Older Children (10 and up) and Adults:
Visit here for a look at our Creation Study.

Monday, July 8, 2013

Make Your Own Cough Medicine from the ~ Pantry Series


Welcome to part two of our "Make Your Own Medicine with Pantry Provisions" (see here for more posts regarding our pantry series).

“Let food be thy medicine and medicine be thy food."
~ Hippocrates

Jacqueline at Deep Roots at Home (with a nursing background and love for natural healing) has graciously agreed to share some information from her archives that will turn your basic food storage into a medicine cabinet as well!

Cayenne, ginger, raw honey and apple cider vinegar are staples in our "Essential Pantry List".

Today, we will learn how to make a cough remedy using these pantry provisions:

cough syrup, home remedy, home made, cayenne, vinegar, honey, medicinal
If you are the adventurous and independent type, here’s a homemade cough syrup recipe that really works. The ingredients are a simple combination of spices and nutrients with no side effects ~no drowsiness, no dry mucous membranes, no cautions about using machinery or driving.

We made this in our home recently to get some relief so we, my older daughter and I, could sleep. It worked for us! (Note: I would not give this mixture to a young child, because the taste is too strong, and do not give honey to children under 1 year of age.)

The recipe is from Herbally Yours by Penny C. Royal. It seems to work for all kinds of coughs but especially for that dry cough that keeps you awake and hangs on long after the cold is over.

Ingredients:

1/4 teaspoon cayenne pepper
1/4 teaspoon ground ginger
1 Tablespoon honey
1 Tablespoon apple cider vinegar
2 Tablespoons water

Mix and take by the teaspoonful. Stir well each time before taking. We keep this in the refrigerator.

The recipe doesn’t mention how much to take. We took 3 teaspoons the first time because we had had this bad cough for over three weeks and were desperate for some relief. It worked, and we got a good night’s sleep.

cough remedy, homemade, cayenne, honey, ginger mixture

Consider the beneficial effects of the individual ingredients:
  • Ginger has long been used and recommended for arthritis and bursitis, because it is a natural anti-inflammatory. Also ginger is a natural antihistamine. It has also been used for for motion sickness and nausea, and in addition, it’s known for relieving chest congestion.
 ginger, ground, spice
  • Cayenne is used as a natural fat burner and pain killer, to treat ulcers, increase metabolism, improve circulation, boost the immune system, and aid digestion.

organic cayenne, ground, spice
  • Raw Honey will draw pus and poisons out of wounds and it is useful for relief from colds. In its raw state it contains untold amounts of micro nutrients and enzymes. 
The next time you have a cough that just won’t quit, you might want to give this homemade cough recipe a try.

Apple Cider vinegar, homemade cough remedy

“The doctor of the future will give no medicine but will interest his patients in the care of the human frame,
in diet and in the cause and prevention of disease.”
~Thomas Edison


Disclaimer: Any cough persisting more than a week, accompanied by headache or fever, and any cough which is productive of thick yellow or green mucous should be evaluated by a physician. I am not a doctor. I do seek scientific confirmation of the safety and effectiveness of the herbs and remedies I use. Using remedies is a personal decision. Nothing I say on this blog is intended to treat or prevent disease.

For 38 years, I have been a wife to my husband and a teacher of our children in the home. Now a new season has come, and with the blessing of my husband, I write this blog as an encouragement to myself and others. (Titus 2: 3-5) How important is this role of speaking into the lives of younger women! The habits of the home in one generation become the morals of society in the next. As William Ross Wallace said: “The hand that rocks the cradle, rules the world.”

Wednesday, July 3, 2013

Canning Sweet & Sour Pickled Peppers ~ Printable Recipe


These pickled peppers are a favorite in our home! They are excellent on fresh, summer style, subway sandwiches. They are also delicious when served on a relish platter with sliced cheeses and olives. You could use any colored peppers. In fact, a variety is desired for the pretty effect in the jars. For some reason, our bell peppers wouldn't make it to the red stage so we had to harvest them all green.


Sterilize 7 pint jars, caps and screw bands. You will find step by step directions for canning procedures here.


Prepare as follows:  Wash, clean out cavity and slice approximately 25 bell peppers into strips. 

Note: A 5 gallon bucket filled to the top will yield enough peppers to make approximately two batches of this recipe (14 pint jars).


Place peppers in large bowl or pot and cover with boiling water. Let sit for five minutes, drain & repeat hot water treatment again. 

Meanwhile, start the brine…


Bring the following to a boil in a non-reactive pot (this is actually enough brine for two batches):
  • 7 cups of water
  • 4 ½ cups of sugar
  • 7 ¼ cups of white vinegar (at least 5% acidity level)

Next, add 1 tsp. oil and 1 tsp. fine sea salt into each of your 7 sterilized, pint jars.


Once peppers are cool enough to handle, pack into sterilized pint jars.

Ladle hot and boiled brine into jars leaving ¼ inch headspace.  Remove any air bubbles that may be lodged in the sides of the jar and wipe the rims clean with a damp cloth.

Place hot lids (they should have been simmering in water the whole time) and screw bands on each jar carefully.


Place pint jars into boiling water bath. Once the water reaches a rolling boil, place lid on canner and begin the processing time for 15 minutes.


Remove from canner and cool for 24 hours. Any jars that didn't seal should be placed in the refrigerator and used within a few weeks.  

Simply press download from the menu below to print the recipe. Our canning labels are found here.